Still not found answer to your query, contact our support team at
These days Online courses have become a popular way for people to become advanced in life and enhance their careers without spending too much money. They can easily access these courses online & LMS (Learning Management System) proved to be a great business tool for one that has been embraced by enterprises and organizations big and small.
Courses - Learning Management System Plugin helps you to create unlimited Classrooms & Courses (free / paid) in them. You can create as many lectures (Document based & Video Tutorials) as you want in the courses. Interested candidates can also give tests for the Particular courses & will get notified when successfully get qualified (pass) the test or when get fail. It simply helps you to create, manage, deliver eLearning courses which users can sell / buy using secure payment gateways PayPal & Stripe.
Please read more about this Plugin here:
https://www.socialenginesolutions.com/social-engine/courses-learning-management-system-plugin/
Watch demo here: https://courses.socialnetworking.solutions/courses
This tutorial will walk you through the steps you need to follow to Install the Courses - Learning Management System Plugin on your website.
** This tutorial assumes that you are already logged in to the Admin Panel.
Installation and Setup of this plugin is very easy, but if you still need our expert to install this plugin for you, then you can purchase the service from here: https://www.socialenginesolutions.com/social-engine/socialenginesolutions-plugin-installation/
Video Tutorial: With the written tutorial, we have created a video which will help you to setup and configure this plugin easily. Watch the video below:
1. Installation of Courses - Learning Management System Plugin
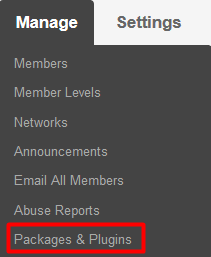
In the Main menu, click on the tab Manage and select “Packages & Plugins”.
2. Please read the tutorial on installing plugins in SES here: http://help.socialenginesolutions.com/faq/51/how-to-purchase-and-install-ses-product.
3. After the successful installation of plugin as in Step 2 above, go to “Plugins” dropdown in the Main menu and select “Courses - Learning Management System Plugin”.

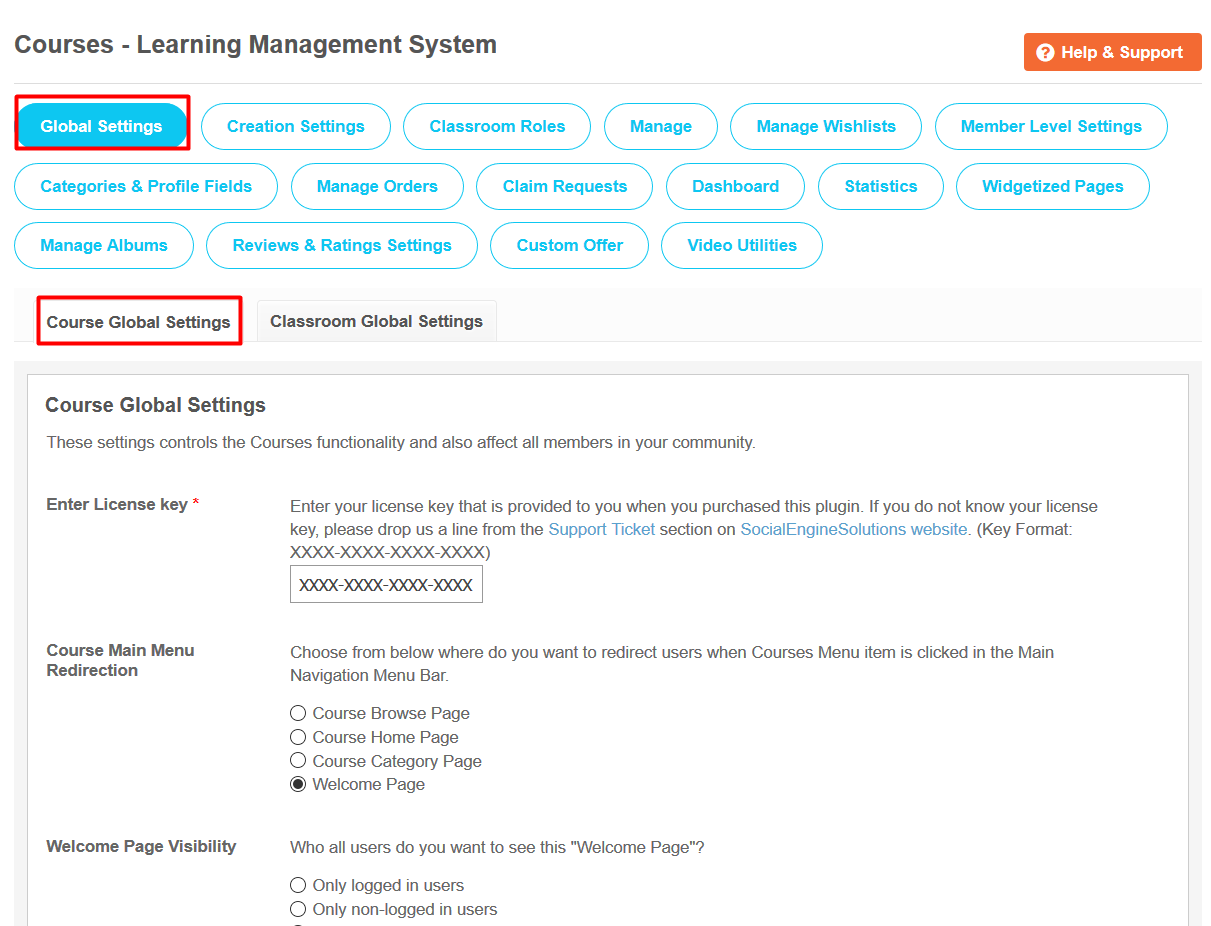
4. Go to the Global Settings:
From here, you can configure various settings for the courses such as enable / disable Course Add to Whishlists, Enable Lectures add to list, Report Courses, Dropdown to Cart, Enable Payment Gateways (PayPal & Secure), Activate Course Orders, Enable Time Limit, Options for Test Results etc. All the settings enabled/disabled will affect courses globally on your website.
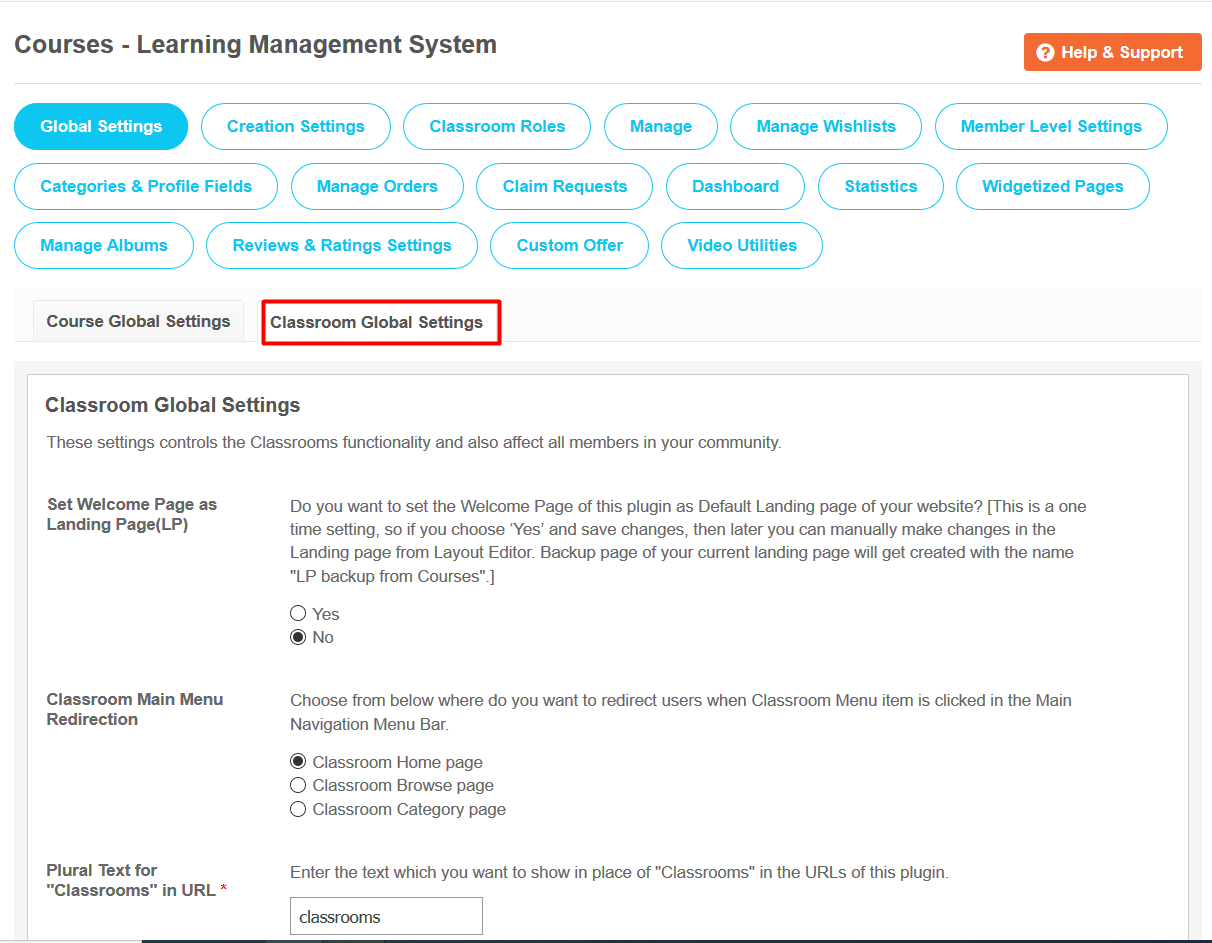
From this section, you can configure various settings for the classrooms such as enable/disable Add watermark to photos, Classroom for Courses, Location for Classrooms, Favourite Classrooms, Share Classrooms, Report, Menu Items Count in Main Navigation, Enable / Disable Auto-Approval of Classroom Posts etc. which will affect all the classrooms on your website globally.
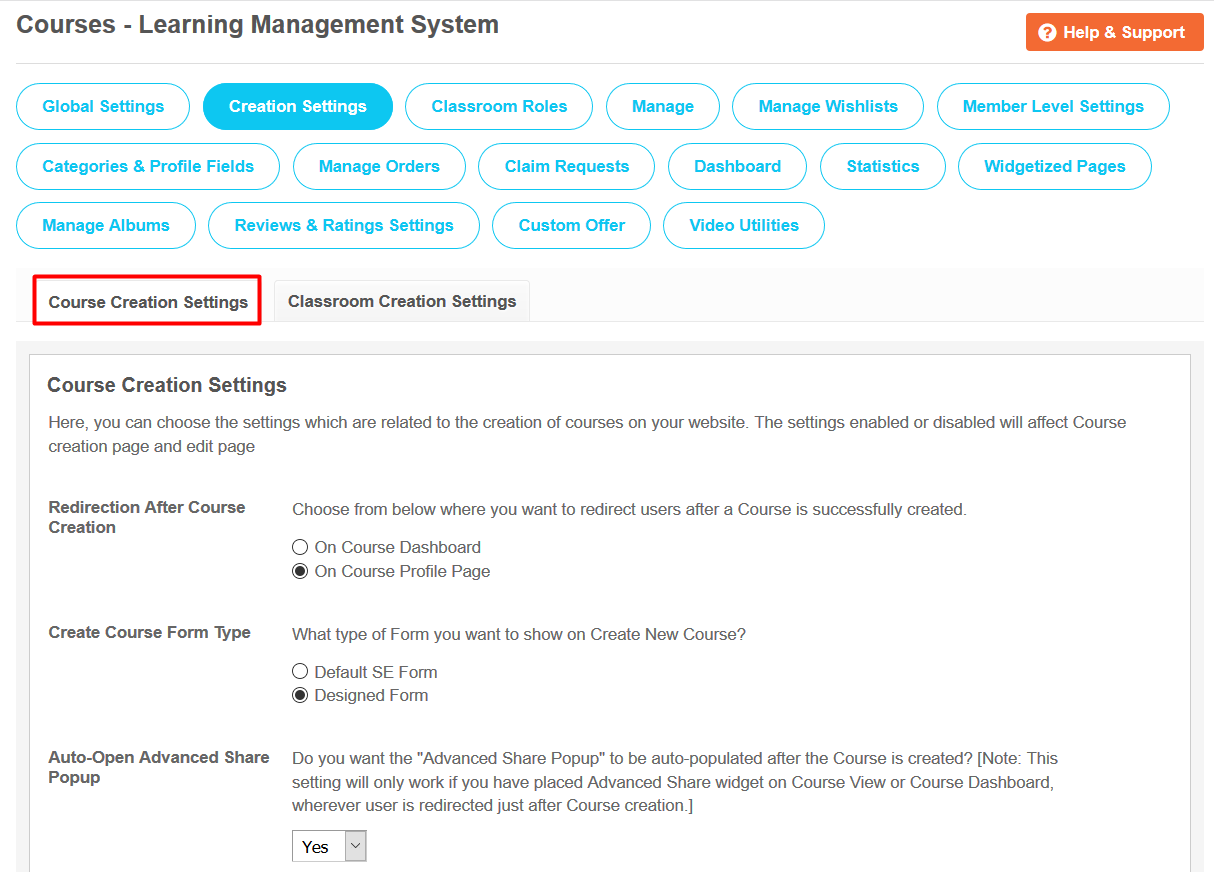
5. Creation Settings:
From this section you can choose the settings which are related to the creation of courses on your website. The settings enabled or disabled will affect Course creation page and edit page on your website. You can enable/disable various settings such as Create Form Type, Course Description, Category, Main Photo for Course, Enable Tags, Discount, Purchase Notes, Custom Course Start Date, Course End Date, People can search for this field etc.
From this section, you can choose the settings which are related to the creation of Classroom on your website. The settings enabled or disabled will affect Classroom creation page, pop-up and edit classroom. Also you can enable/disable various other settings as well such as Enable Category for Classrooms, Edit Custom URL, Description for Classrooms, Main Photo, Tags, Classroom Joining, Member Approval options, Invitations in Classroom & many more….

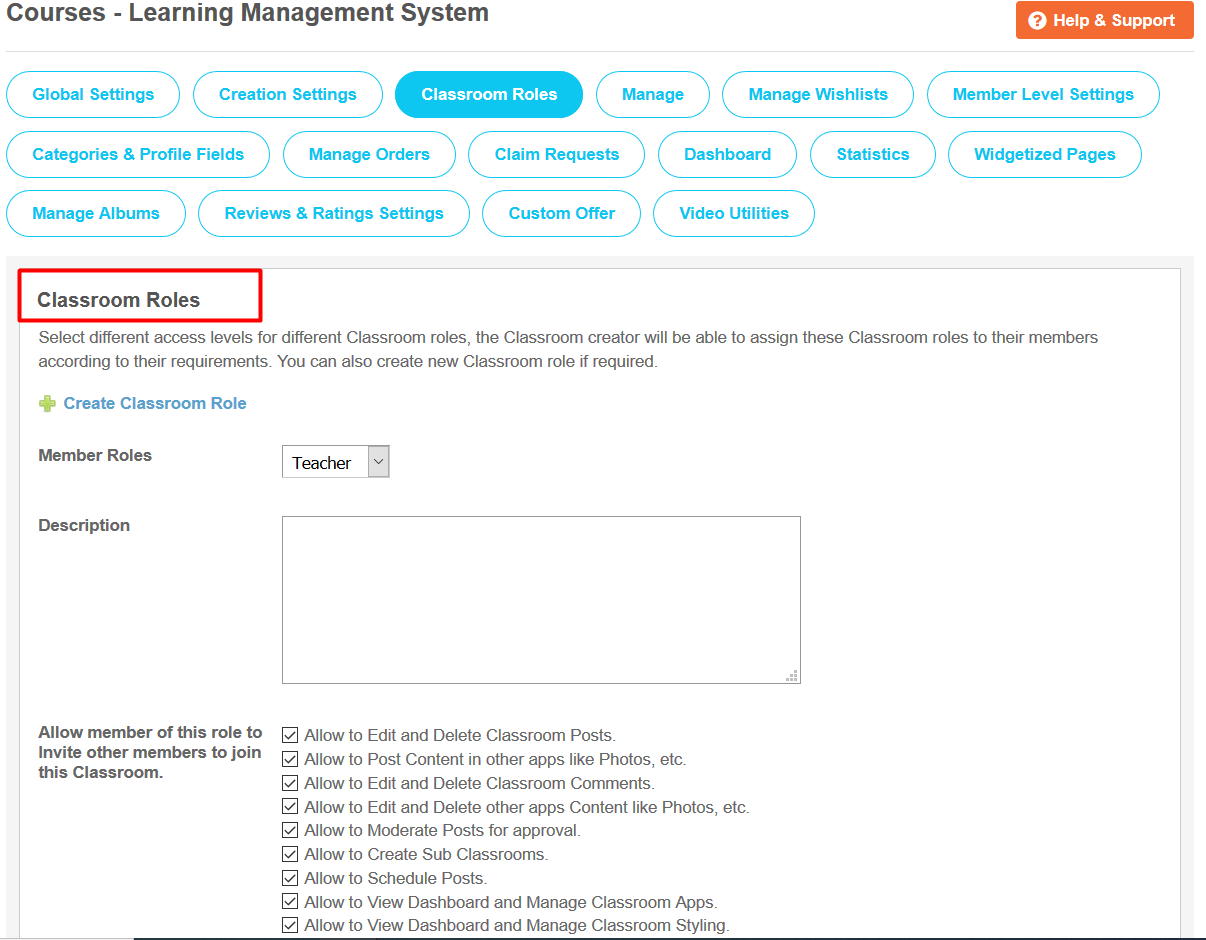
6. Classroom Roles:
From this section, you can select different access levels for different Classroom roles, the Classroom creator will be able to assign the Classroom roles to their members according to their requirements. You can also create new Classroom role if required from this section in the admin panel.
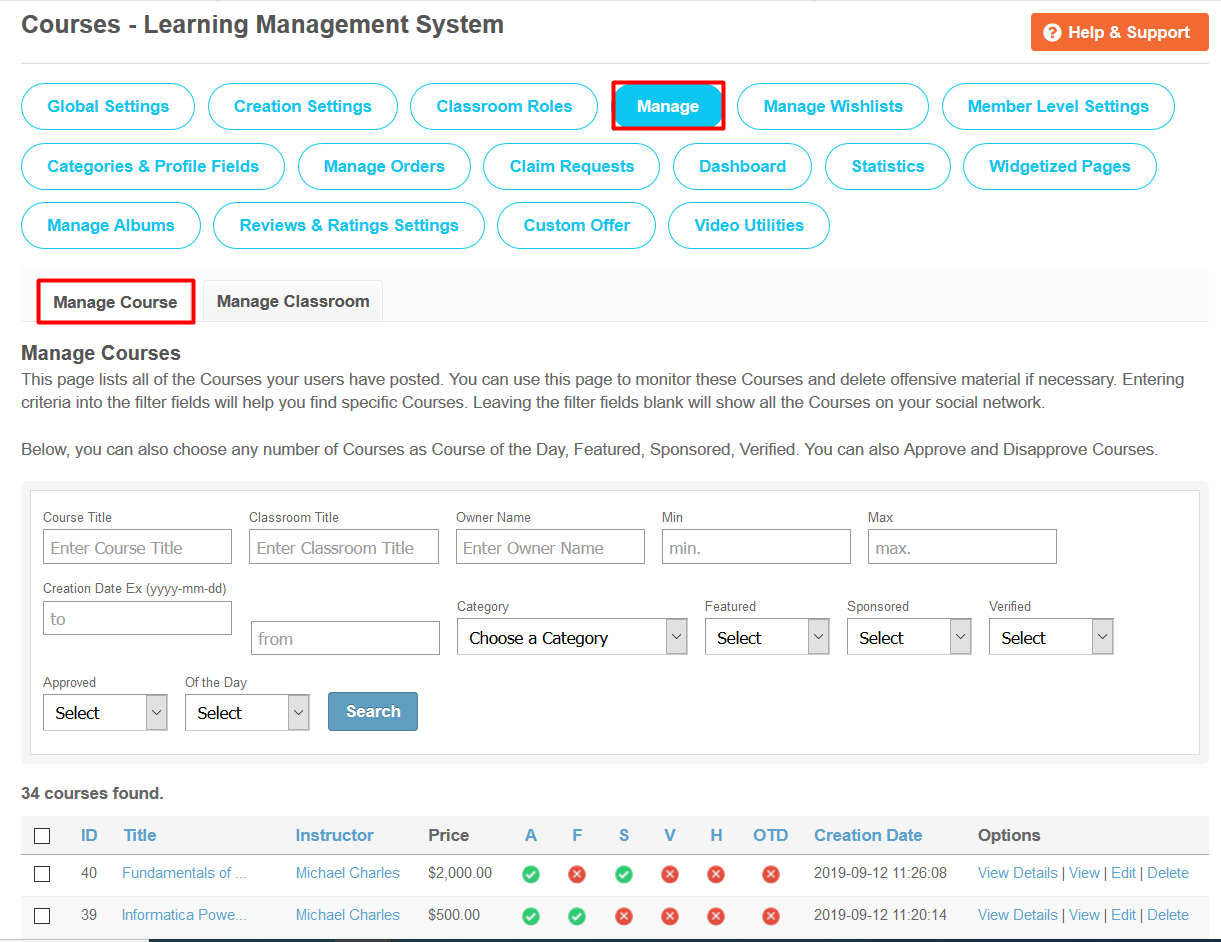
7. Manage:
This section lists all of the Courses your users have posted. You can use manage courses page to monitor all the created Courses and can also delete offensive material if necessary. You can also search any of the specific course by entering the searching criteria into the filter fields. You can also mark any number of Courses as Course of the Day, Featured, Sponsored, Verified. You can also Approve and Disapprove Courses.
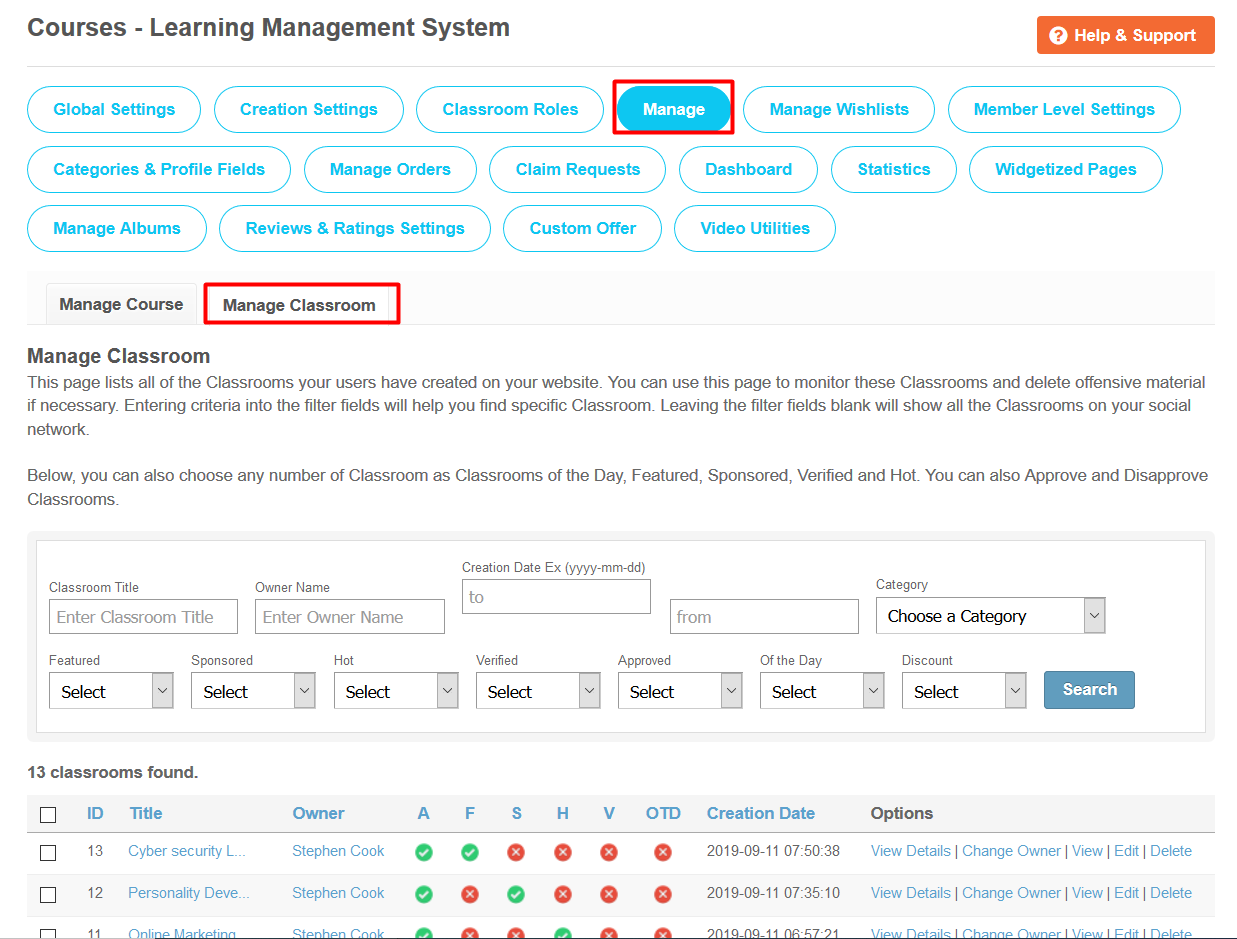
This section lists all of the Classrooms your users have posted. You can use manage classrooms page to monitor all the created Classrooms and can also delete offensive material if necessary. You can also search any of the specific classroom by entering the searching criteria into the filter fields. Also mark any number of Courses as Course of the Day, Featured, Sponsored, Verified. You can also Approve and Disapprove Courses.
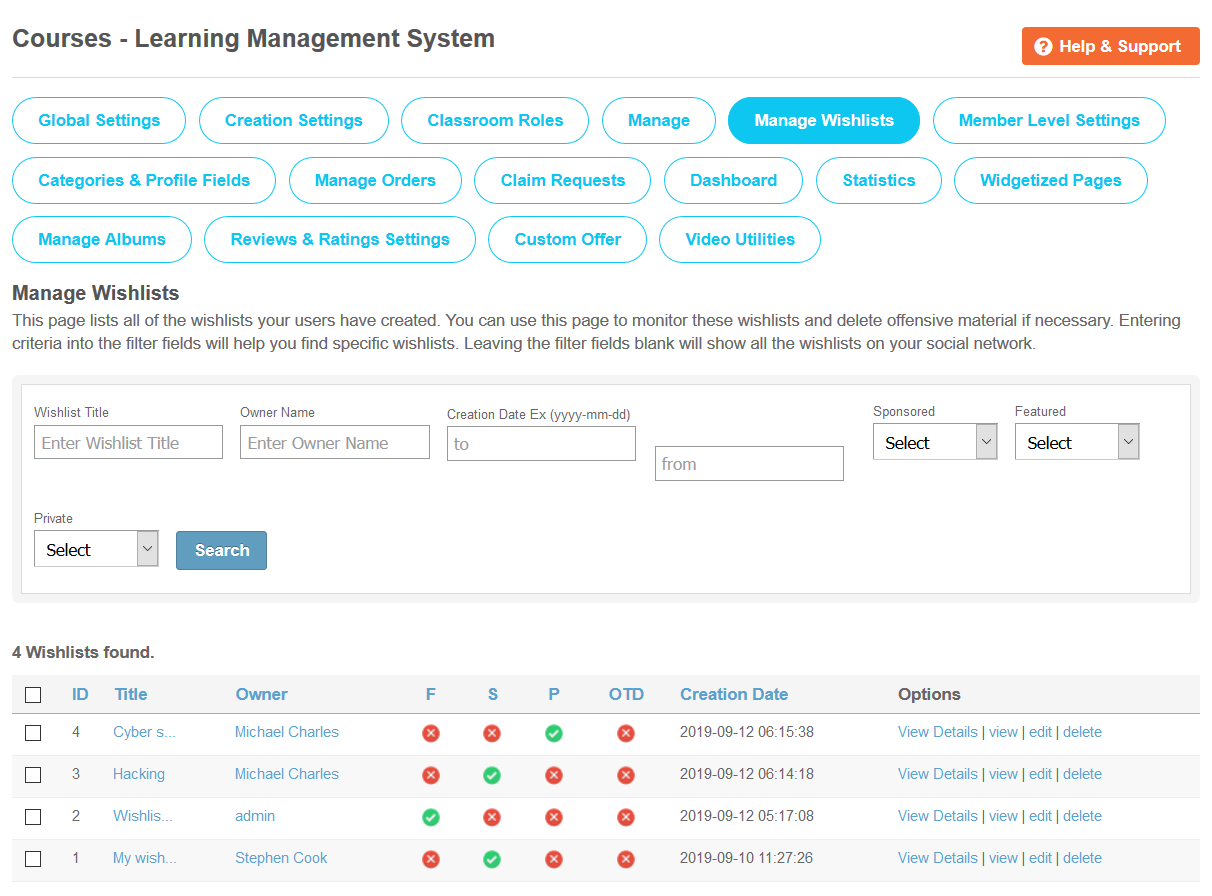
8. Manage Whishlists:
This section lists all the whishlists your users have created on your website. You can use this page to monitor all the whishlists and can also delete any offensive material from them if required. Searching system at this page will help you much better to find any specific wishlist among all by entering the searching criteria into the filter fields. Site Admin can mark any of the whishlist as Featured, Sponsored & Private from this section as per the choice.
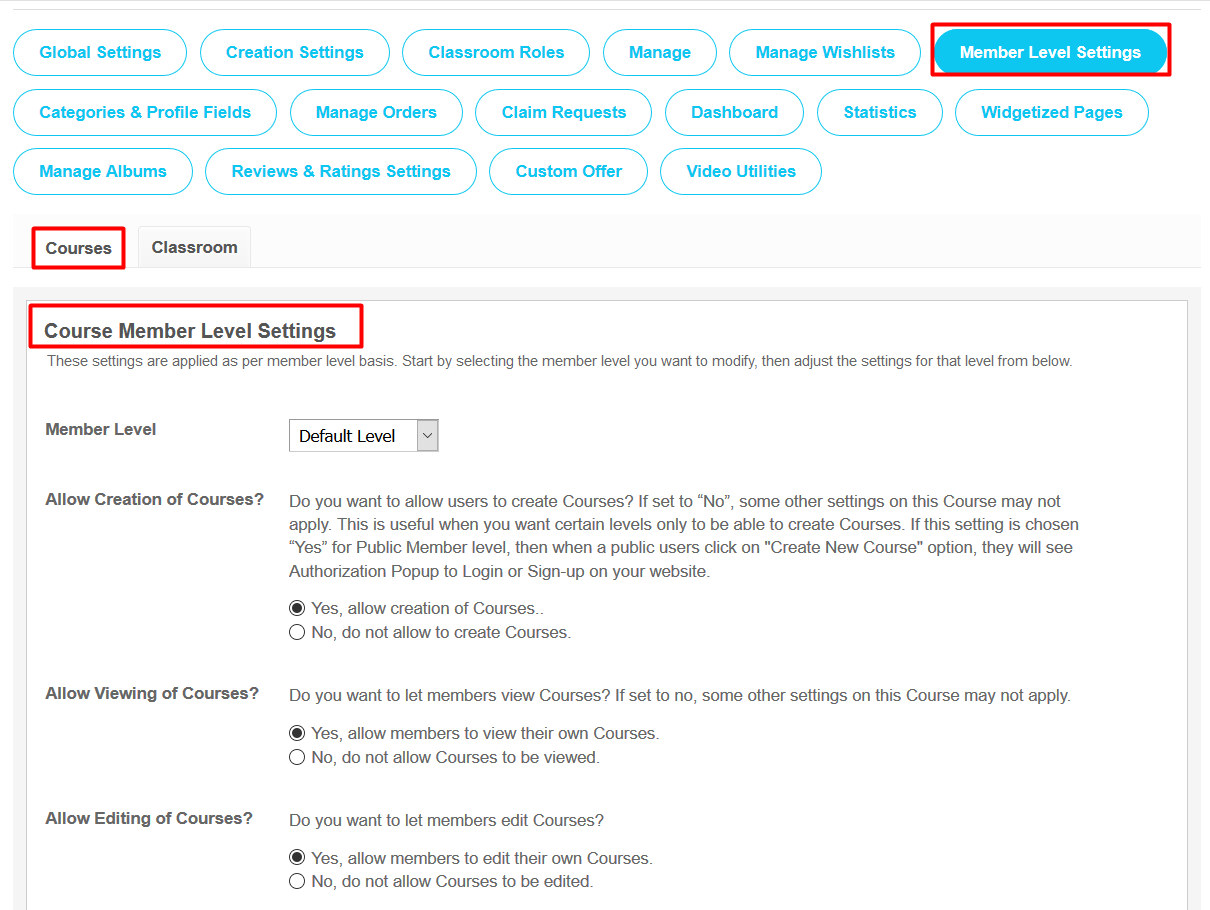
9. Member Level Settings:
From this section, you can configure various settings for the courses based on the different member levels. These settings are applied as per member level basis. Start by selecting the member level you want to modify then adjust the settings for that level from this section. You can configure various settings on the member level bases such as creation of courses, viewing of courses, editing of courses, deletion of courses, commenting on courses, upload courses main photo, auto approve courses, View & Comment Privacy, Allowed number of courses, lectures & tests, allow to create lectures & Tests, commission value etc.
From this section, you can configure various settings for the classrooms based on the different member levels. These settings are applied on a per member level basis. You can configure the settings for the classrooms like Viewing, Editing, Creation, Deletion, Commenting etc. Also you can configure view & comment privacies for Classrooms, Add Multiple Locations, Allow to Claim Classrooms, Contact Classroom Members, Enable various Classrooms Designs 1, 2, 3, 4, Auto Approve for Classrooms, Allow to mark Classrooms as Featured, Sponsored, Verified, Hot, Allow to join Classrooms & many other useful settings can be easily configured from this section.

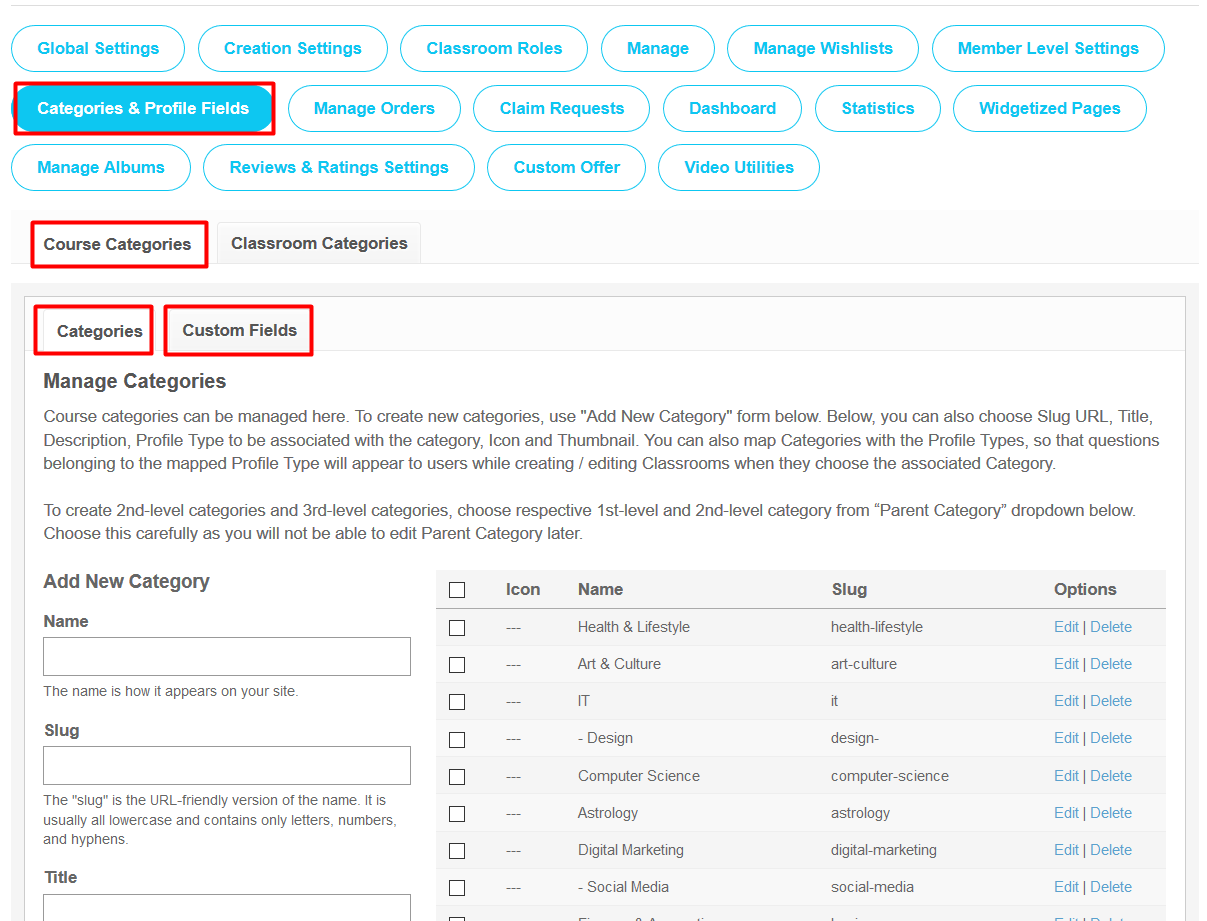
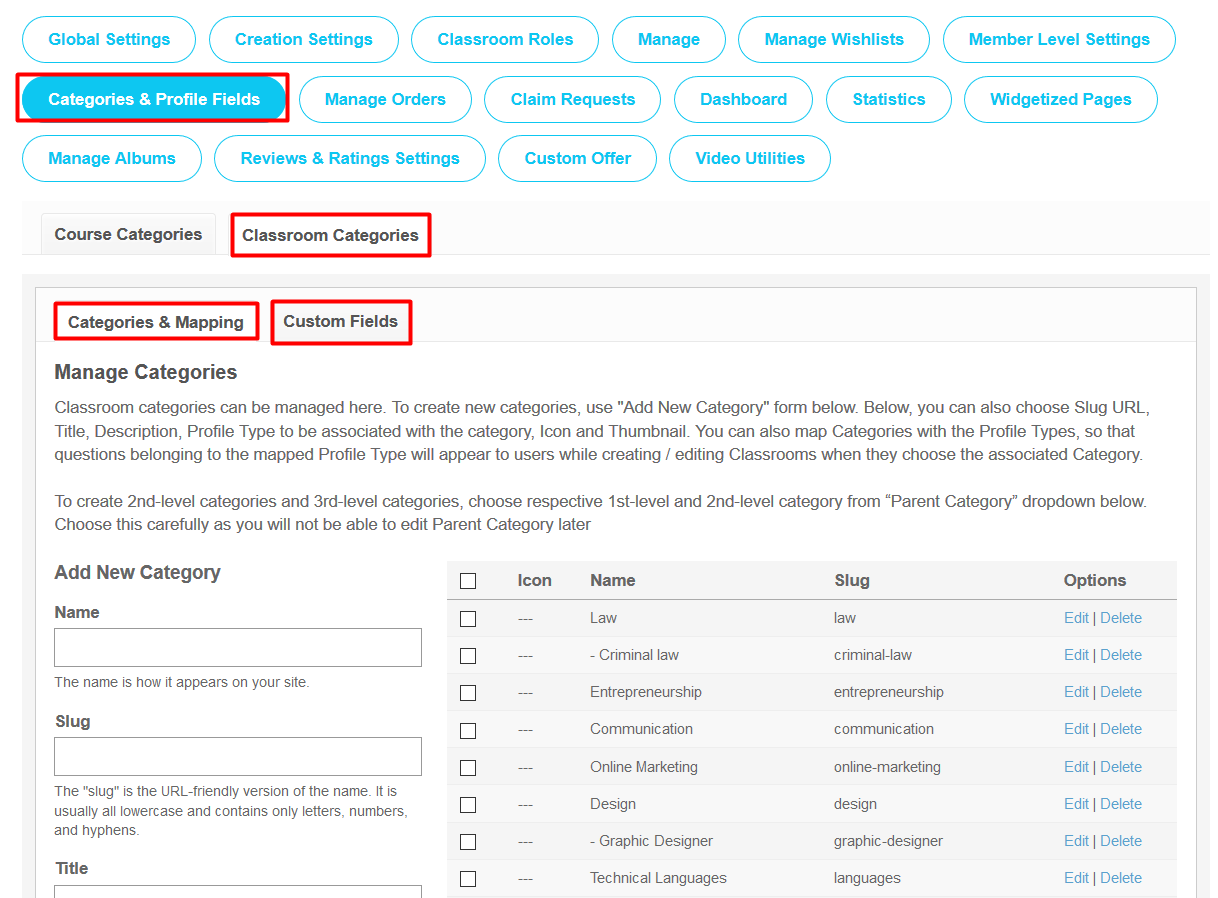
10. Categories & Profile Fields:
Course Categories:
Site Admin can manage course categories from this section. You can create new categories as well by clicking on “Add New Category” link at this section. Also you can choose slug URL, Title, Description, Profile Type to be associated with the Category, Icon & Thumbnail. You can also map Categories with the Profile Types, so that questions belonging to the mapped Profile Type will appear to users while creating / editing Classrooms when they choose the associated Category. From this section, Site owner can also create 2nd-level categories and 3rd-level categories.
Classroom Categories:
Site Admin can manage classroom categories from this section. You can create new categories as well by clicking on “Add New Category” link present at this section. Also you can choose slug URL, Title, Description, Profile Type to be associated with the Category, Icon & Thumbnail. You can also map categories with the Profile Types, so that questions belonging to the mapped Profile Type will appear to users while creating / editing Classrooms when they choose the associated Category. From this section, Site owner can also create 2nd-level categories & 3rd-level categories.
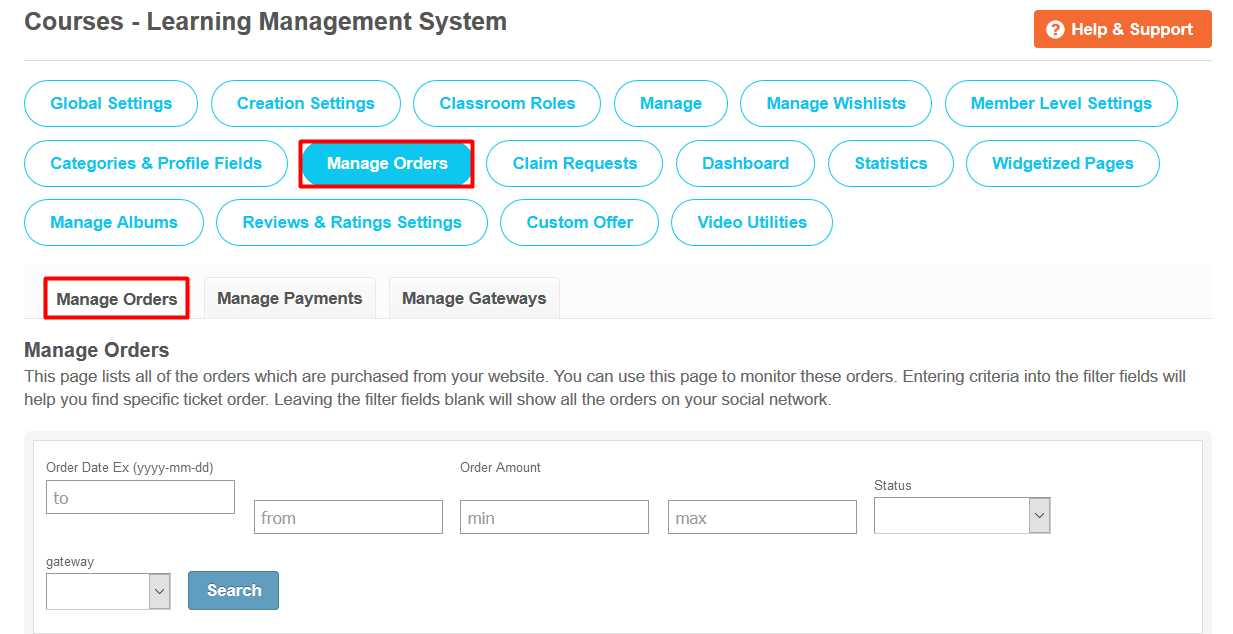
11. Manage Orders:
This section will contain all of the orders which are purchased from your website. By entering the criteria into the filter fields, you can find specific ticket order. Leaving the filter fields blank will show all the orders on your social network. You can use this page to monitor all the orders. Entering criteria into the filter fields will help you find specific ticket order. Leaving the filter fields blank will show all the orders on your social network.
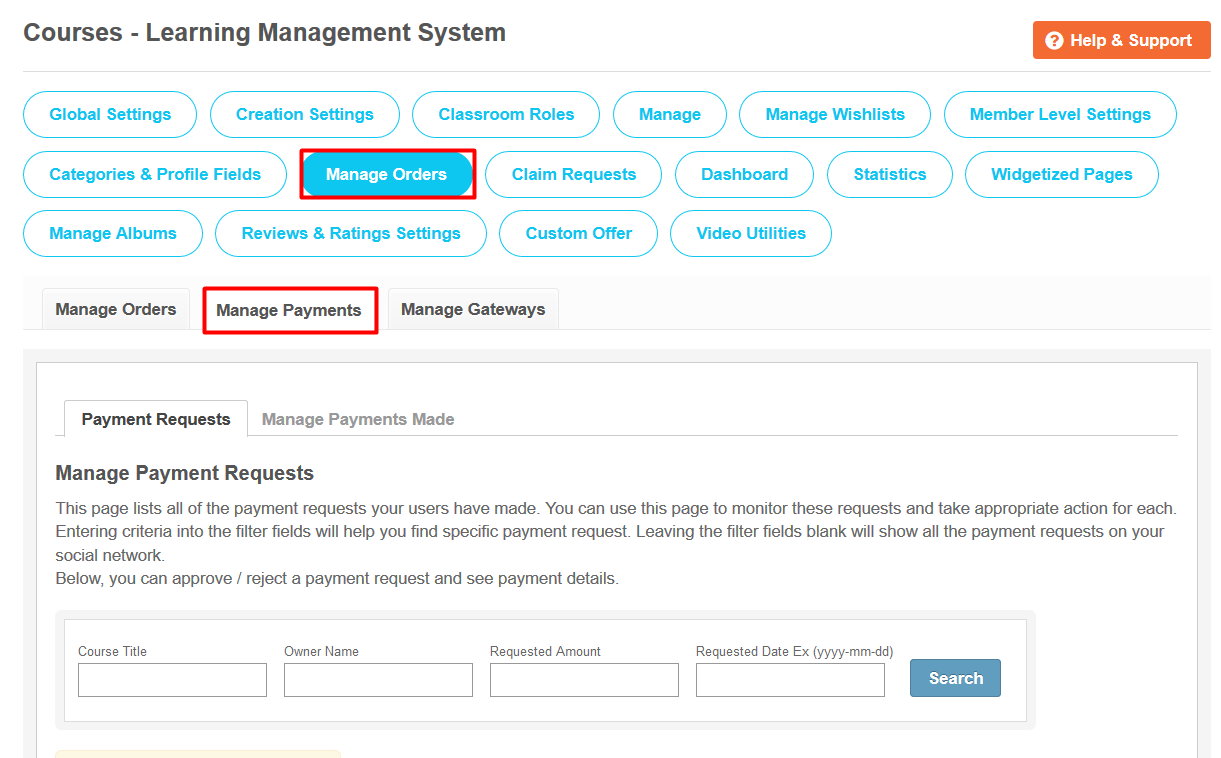
12. Manage Payments:
This section lists all of the payment requests your users have made. You can use this page to monitor these requests and take appropriate action for each. Entering criteria into the filter fields will help you find specific payment request. Leaving the filter fields blank will show all the payment requests on your social network. Also you can approve / reject a payment request and see payment details.
Payment Made to Course Owners:
This section lists all of the payments made to the course owners on your website. You can use this page to monitor these payments made. Entering the criteria into the filter fields will help you find specific payment details. Leaving the filter fields blank will show all the payments made to course owners on your social network.
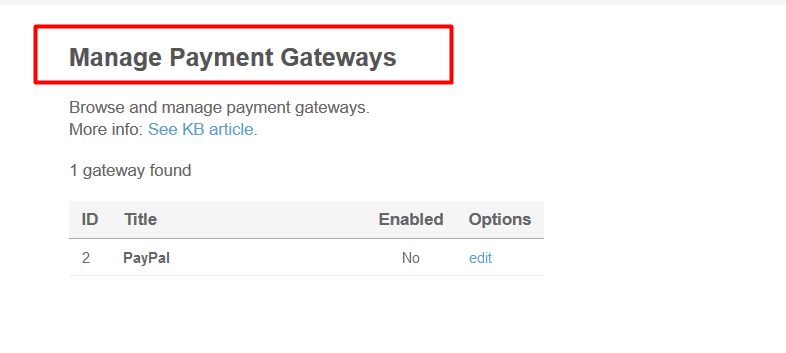
13. Manage Gateways:
From this section, site admin can easily manage & enabled / disabled payment gateways such as PayPal & Stripe by entering the details for them. With these payment gateways, site admin can easily manage various transactions related to the buying of courses & payment related to them. These are the secure payment gateways & help site admin to accept payment securely.
14. Claim Requests:
This section lists all of the claim requests your users have made for the courses on your website. You can use this page to monitor the requests and approve / decline them whenever required. Entering criteria into the filter fields will help you find specific claim requests. Leaving the filter fields blank will show all the requests on your social network.

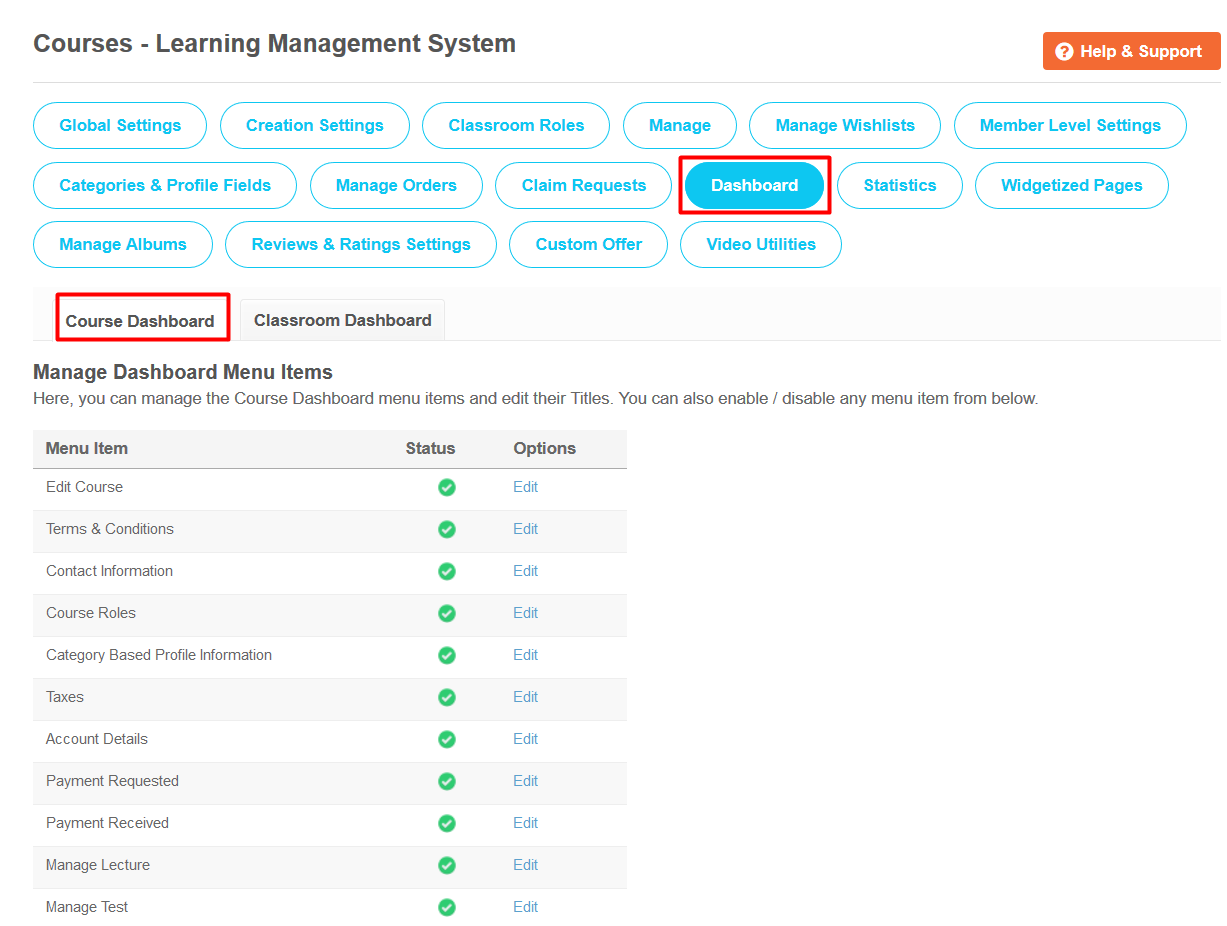
15. Course Dashboard:
From this section, site admin can manage the Course Dashboard menu items and edit their Titles also. You can also enable / disable any menu item or can add a new one also.
16. Classroom Dashboard:
Site admin can manage the Classroom Dashboard menu items and edit their Titles from this section. You can also enable / disable any menu item or can add a new one also.

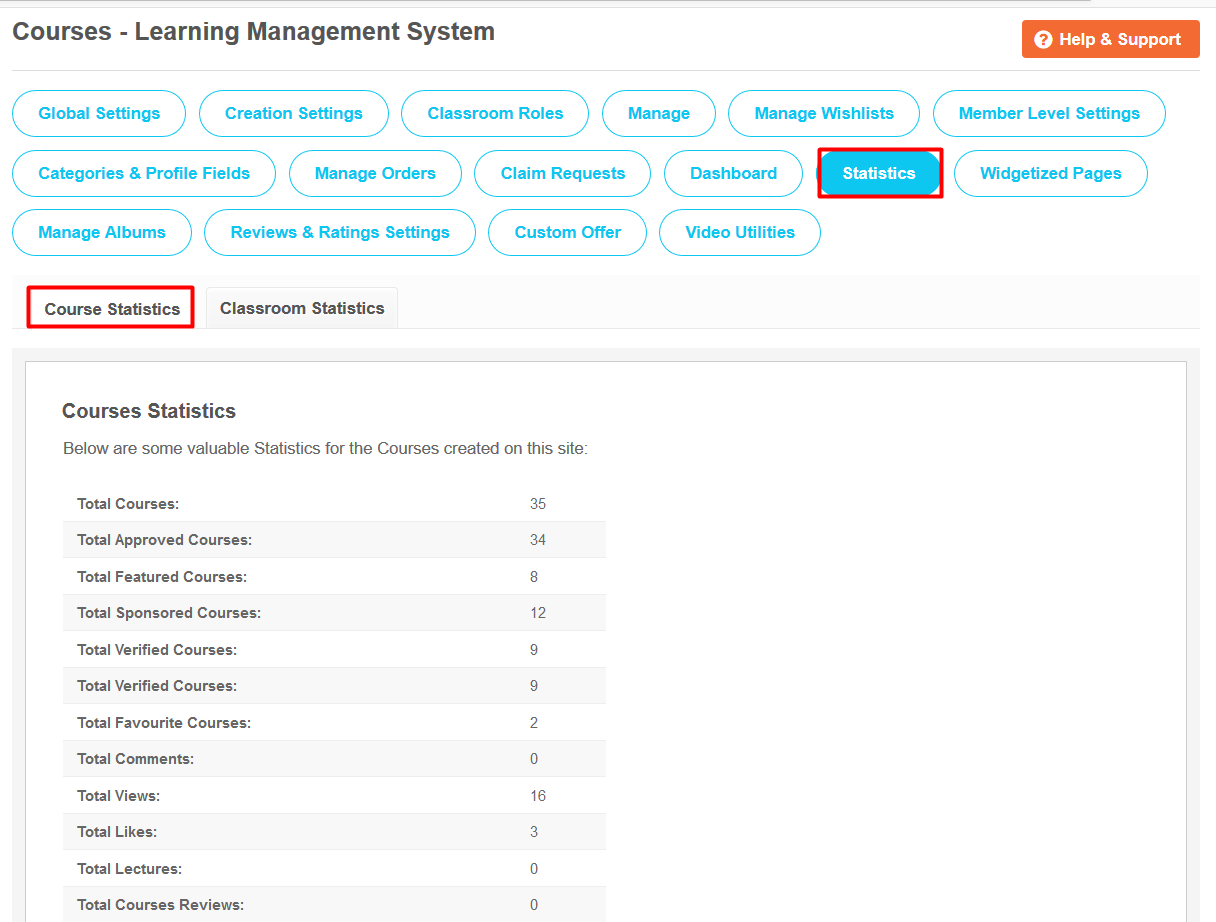
17. Course Statistics:
This section contains some of the valuable Statistics for the Courses created on your website.
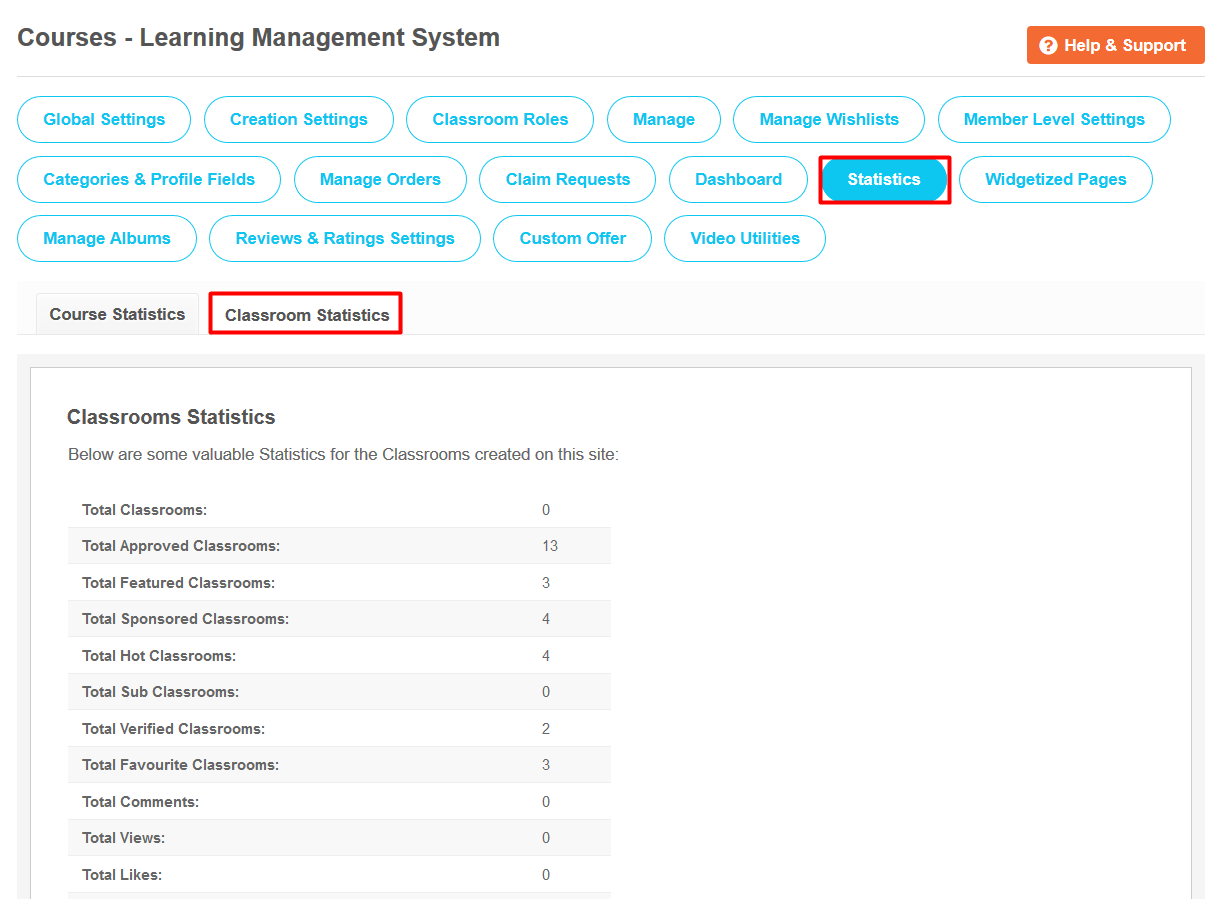
18. Classroom Statistics:
This section contains some of the valuable Statistics for the Classrooms created on your site.
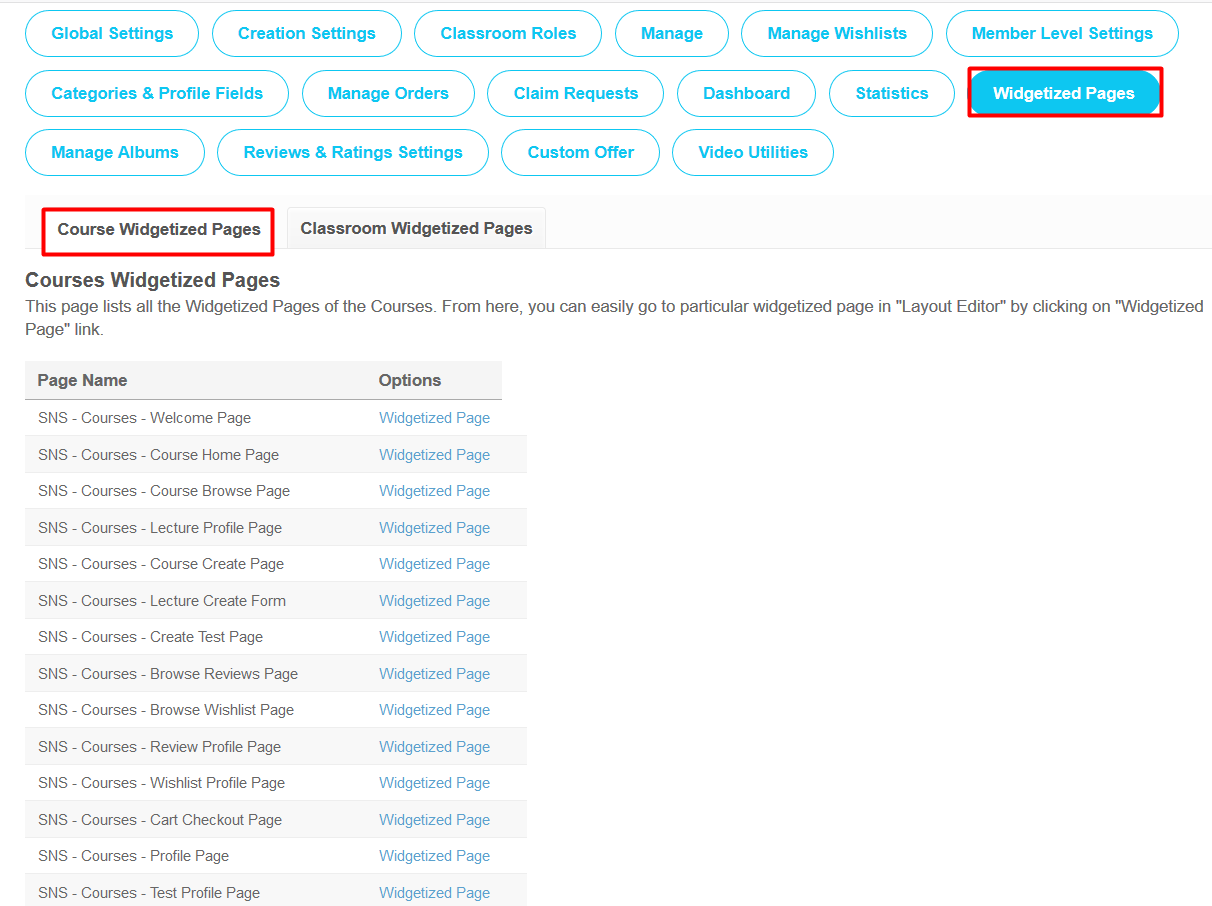
19. Courses Widgetized Pages:
This section lists all the Widgetized Pages of the Courses. From here, you can easily go to particular widgetized page in "Layout Editor" by clicking on "Widgetized Page" link.
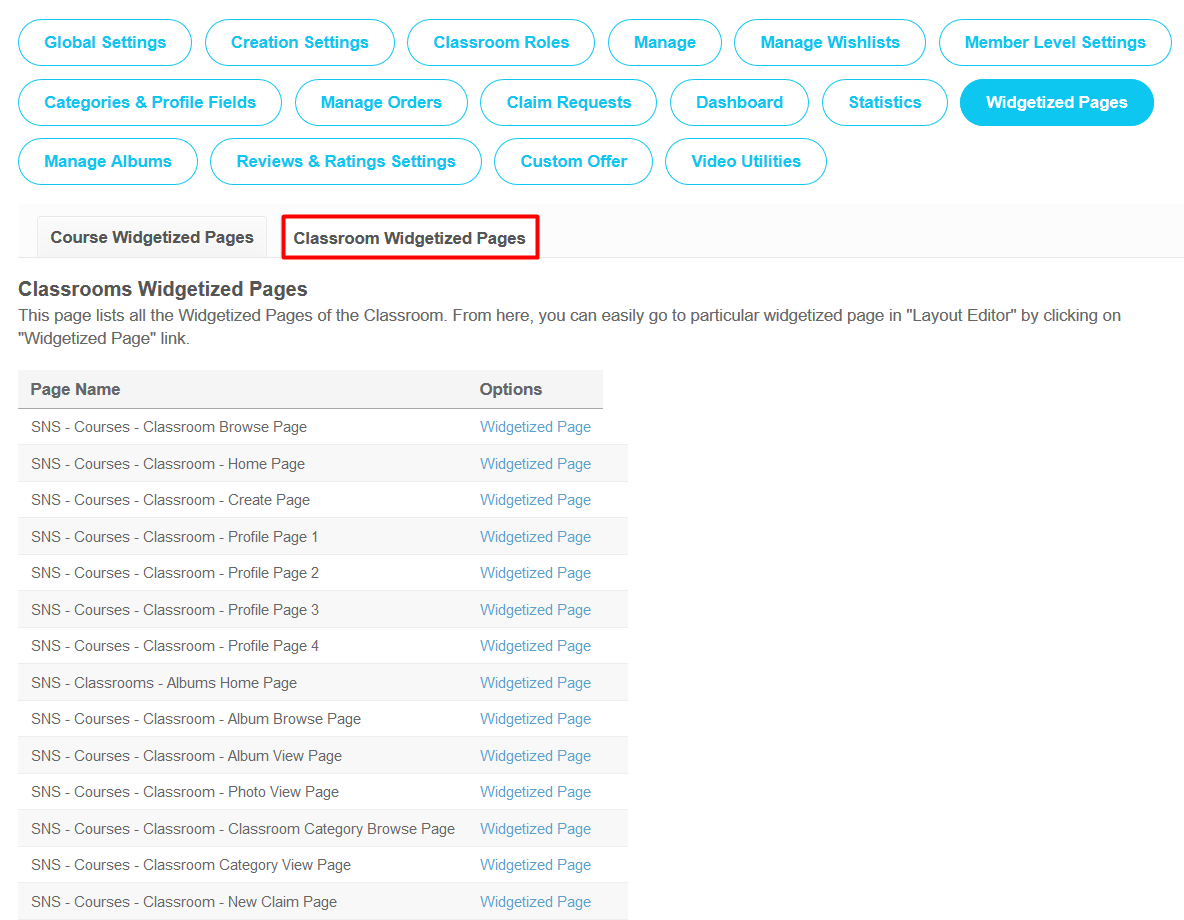
20. Classroom Widgetized Pages:
This section lists all the Widgetized Pages of the Classrooms. From here, you can easily go to particular widgetized page in "Layout Editor" by clicking on "Widgetized Page" link.
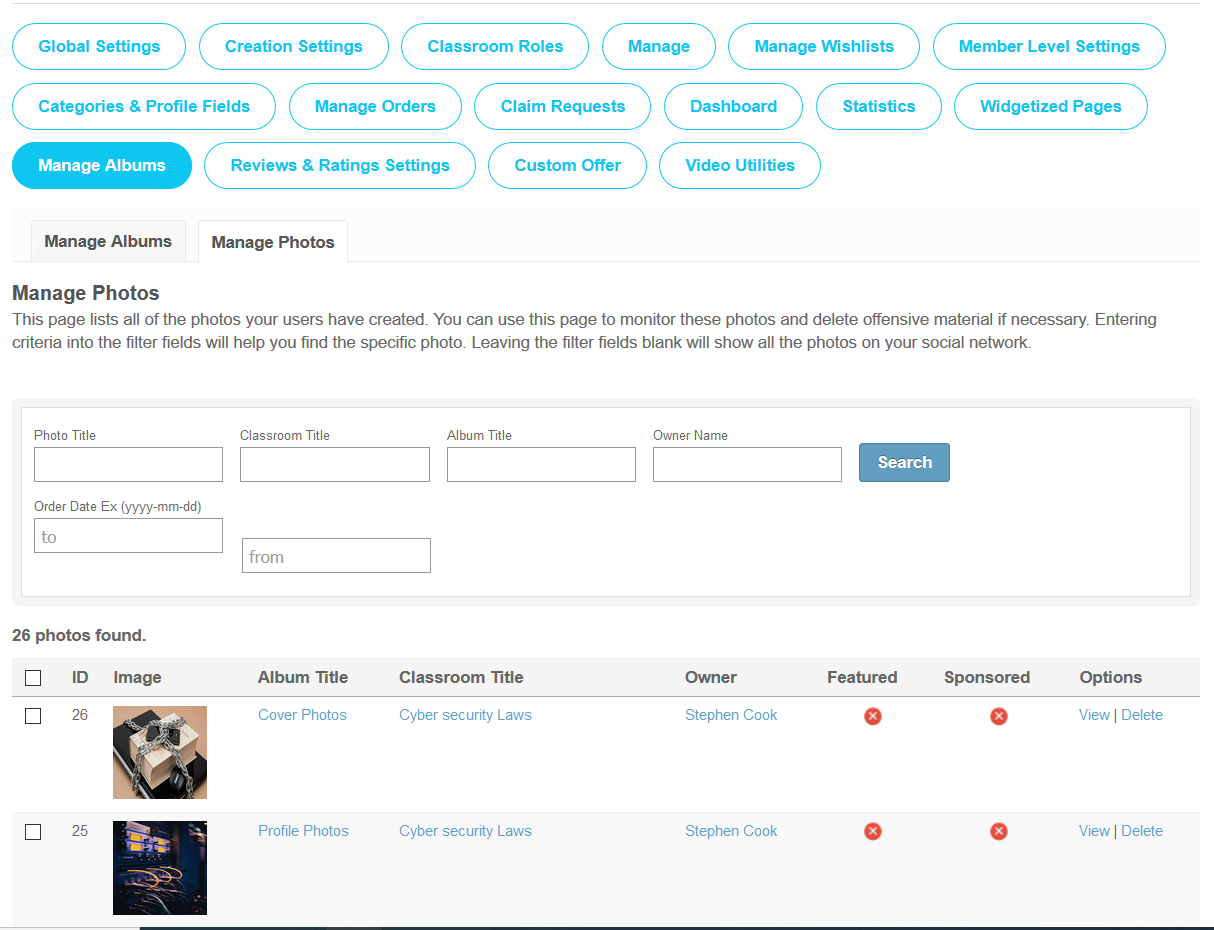
21. Manage Albums:
This section lists all of the albums & photos your users have created in the classrooms on your website. You can use this page to monitor these albums and delete offensive material if necessary. Entering the criteria into the filter fields will help you find specific album or photo. Leaving the filter fields blank will show all the albums / photos on your social network. From this section you can mark any of the photo & album as featured / sponsored as per your choice.
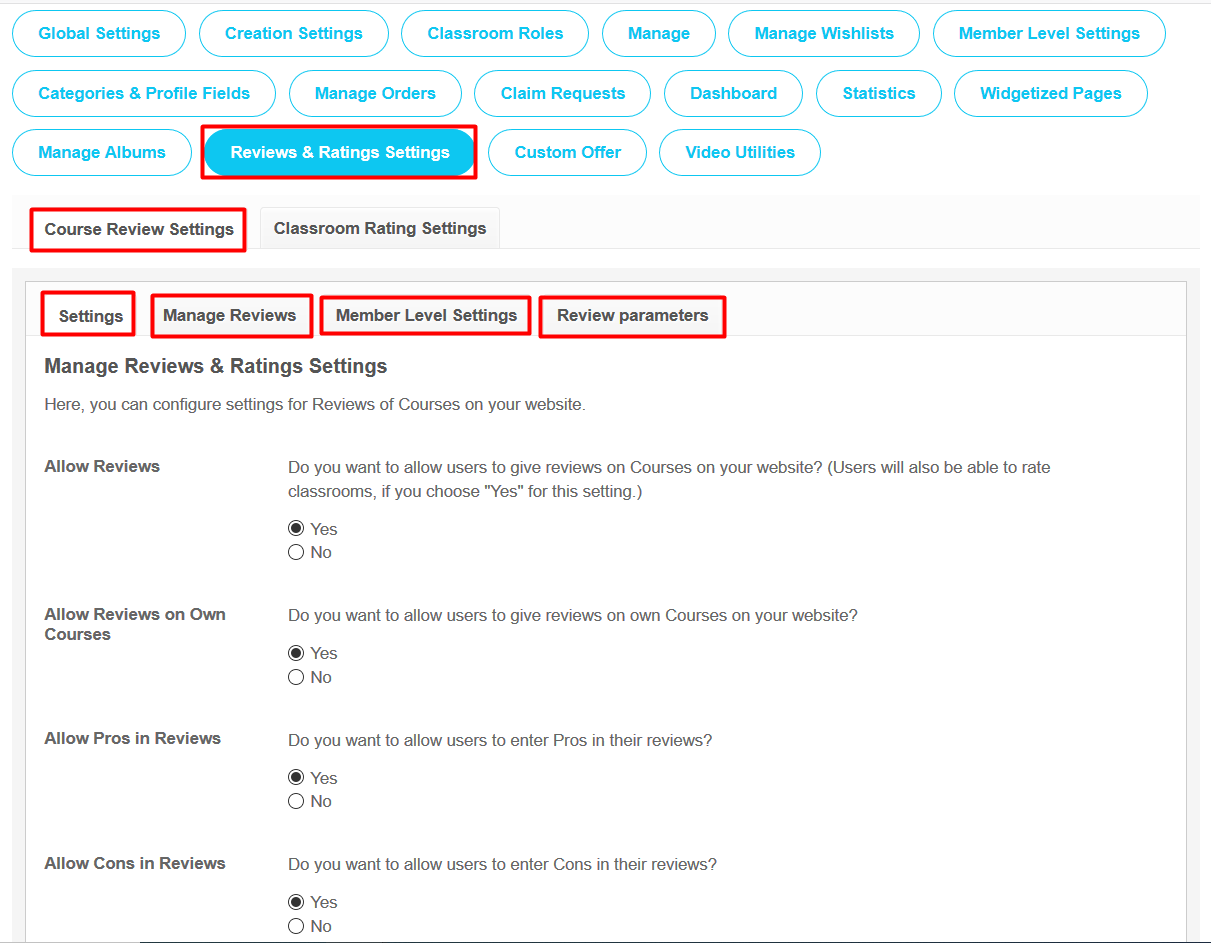
22. Course Reviews Settings:
From this section, you can configure & enable/disable various settings for Reviews of Courses on your website. Also you can manage these reviews & mark them as Featured / Sponsored / Of the Day as per your choice. Site Admin can also configure various other settings based on the Member Level also such as allow to view, write, edit, delete or comment on the course reviews. Also from Review Parameters section, you can create Review Parameters for Course categories. You can edit, delete and write Parameter according to your choice from this section.
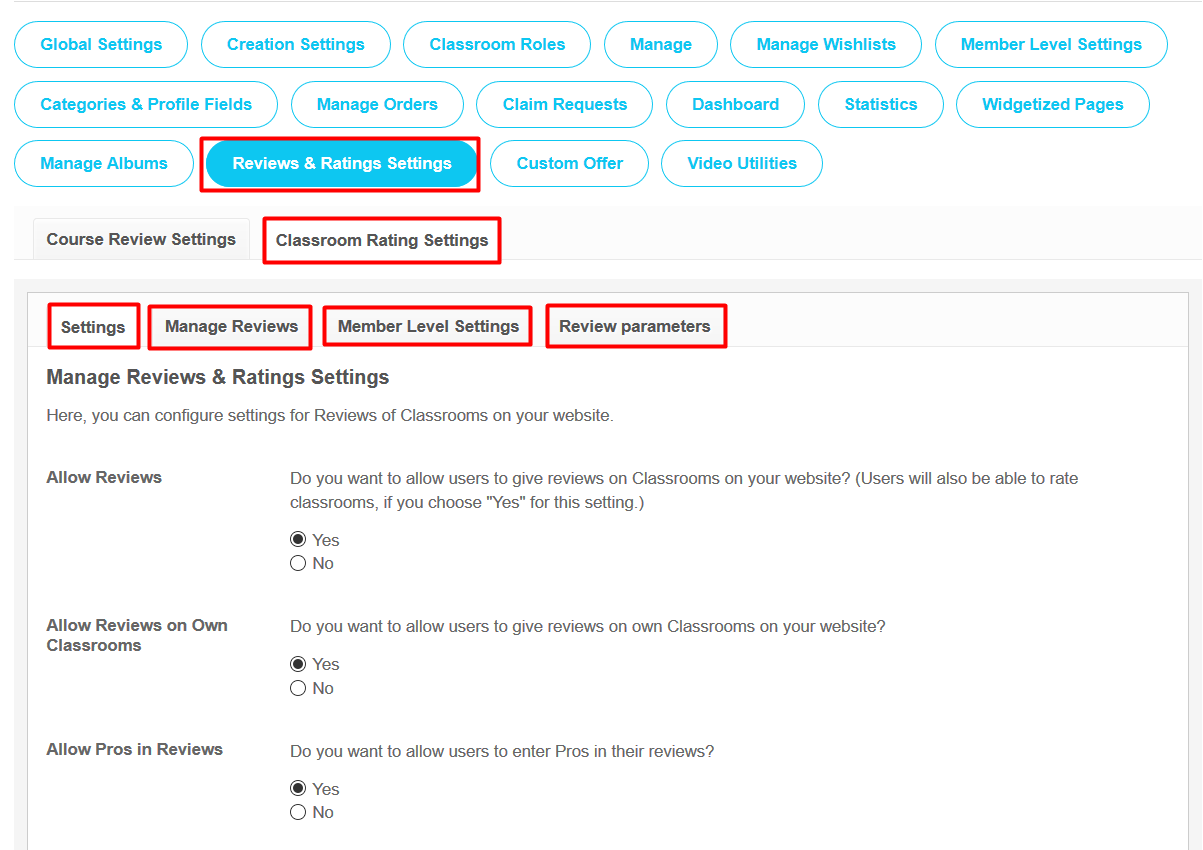
23. Classroom Review Settings:
From this section, you can configure & enable/disable various settings for Reviews of Classrooms on your website. Also you can manage these reviews & mark them as Featured / Sponsored / Of the Day as per your choice. Site Admin can also configure various other settings based on the Member Level also such as allow to view, write, edit, delete or comment on the classroom reviews. Also from Review Parameters section, you can create Review Parameters for Course categories. Also you can edit, delete and write Parameter according to your choice from this section.
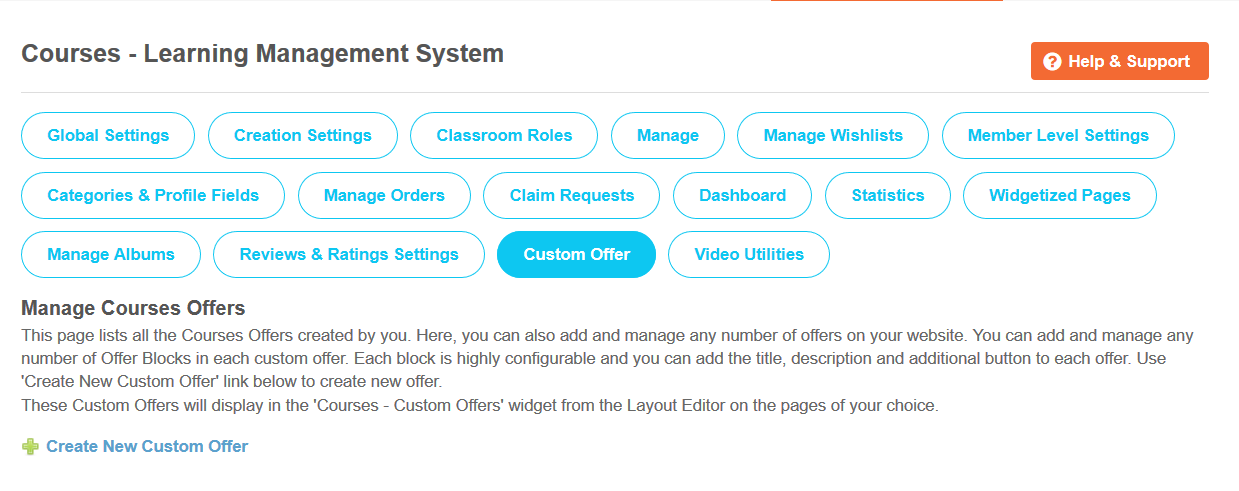
24. Manage Courses Offers:
This section lists all the Courses Offers created by you on your website. Here, you can also add and manage any number of offers on your website. You can add and manage any number of Offer Blocks in each custom offer. Each block is highly configurable and you can add the title, description and additional button to each offer. Use 'Create New Custom Offer' link below to create new offer. All the created custom offers will display in the 'Courses - Custom Offers' widget from the Layout Editor on the pages of your choice.
25. Video Utilities:
This page contains utilities to help, configure and troubleshoot the videos which are created using this plugin.

26. Help & Support:
If you have any query or doubt about creating & managing Courses and Classrooms on your website, then you can refer to this Help & Support section. This page will help you out with all the Queries regarding Classrooms & Courses on your website such as Product Description, Screenshots, FAQs, Video etc.
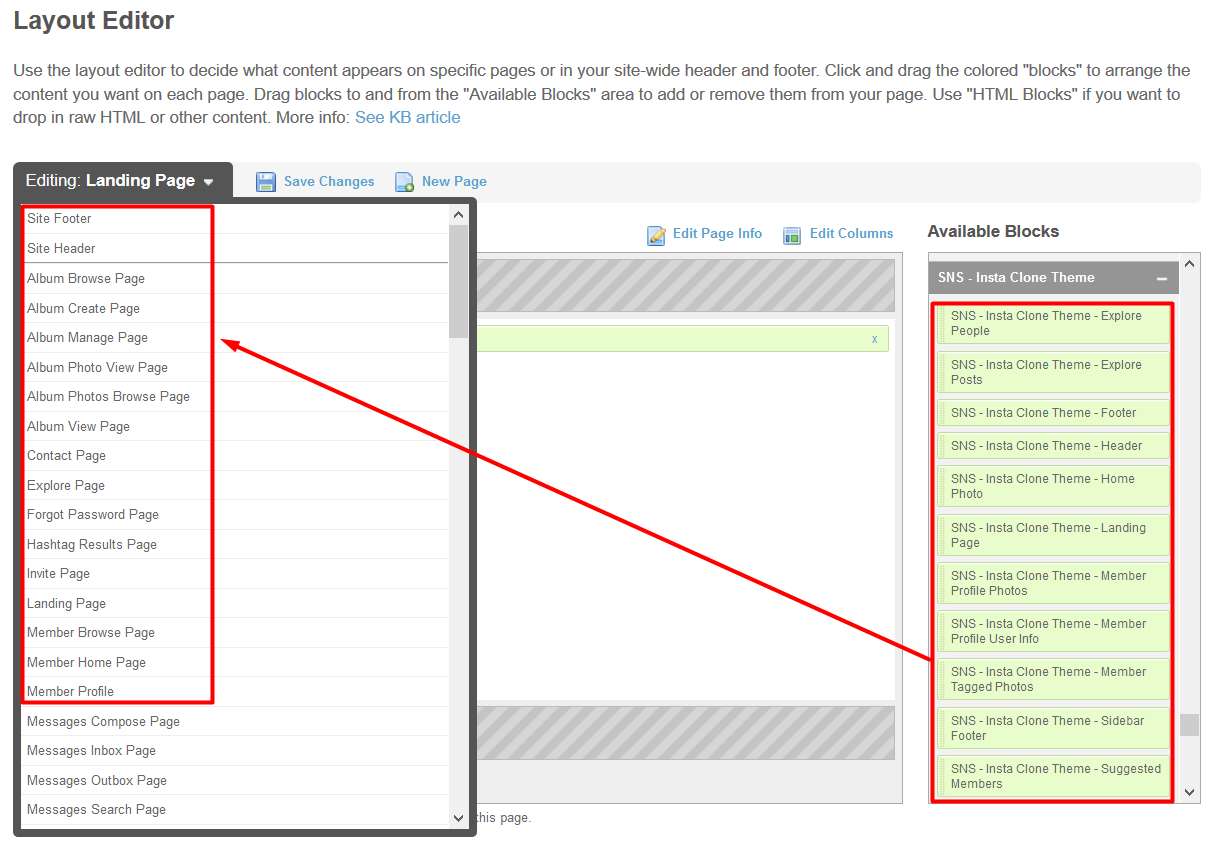
27. Layout Editor:
Layout Editor is the only place for our SNS Products where you can place various widgets for the pages and configure those widgets according to your requirement as well. This Plugin contains numbers of highly configurable widgets which you can place at the respective pages of this plugin and can enable / disable various settings as per your choice.
Great! You have completed the installation and setup of this plugin now and your users will be able to create & manage courses & classrooms in them as per their choice.
Installation of this plugin is very easy, but if you still need our expert to install this plugin for you, then you can purchase the service from here:
https://www.socialenginesolutions.com/social-engine/socialenginesolutions-plugin-installation/